“Cherry Hand Pies From Scratch”
Cherry hand pies are just a classic cherry pie in a handheld form! It’s great for when you’re hosting a socially distant BBQ or if you have young ones who might bicker over which slice is the biggest. I find that they’re easier to serve, and a bonus is you get even more of that delicious, crispy pie crust to balance out the sweetness of the cherry pie filling.
How To Make Cherry Hand Pies
If you aren’t ready to try your hand at a traditional cherry pie (You should be! It’s easier than you think!), then cherry hand pies won’t only give you some baking confidence, they’ll give you a delicious treat you’ll turn to again and again. And don’t forget to get the full recipe with measurements, on the page down below:
- First, make the filling. In a saucepan, over medium heat, combine your sugar, cornstarch, lemon juice, and water. Let this simmer for 2-3 minutes until it has thickened.
- Remove this from the heat and stir in your pitted and halved cherries. Set aside to cool.
- As the filling cools, roll out your pie crusts and cut them into 5-inch (12.5 cm) circles.
- Spoon a small amount of the cherry filling into the center of your cut out crust. Moisten the edge with egg wash and fold over to create a half-moon shape. Press down with your fingers or use a fork to seal.
- Place your assembled pies onto baking sheets lined with parchment paper and place it into the refrigerator for 30 minutes.
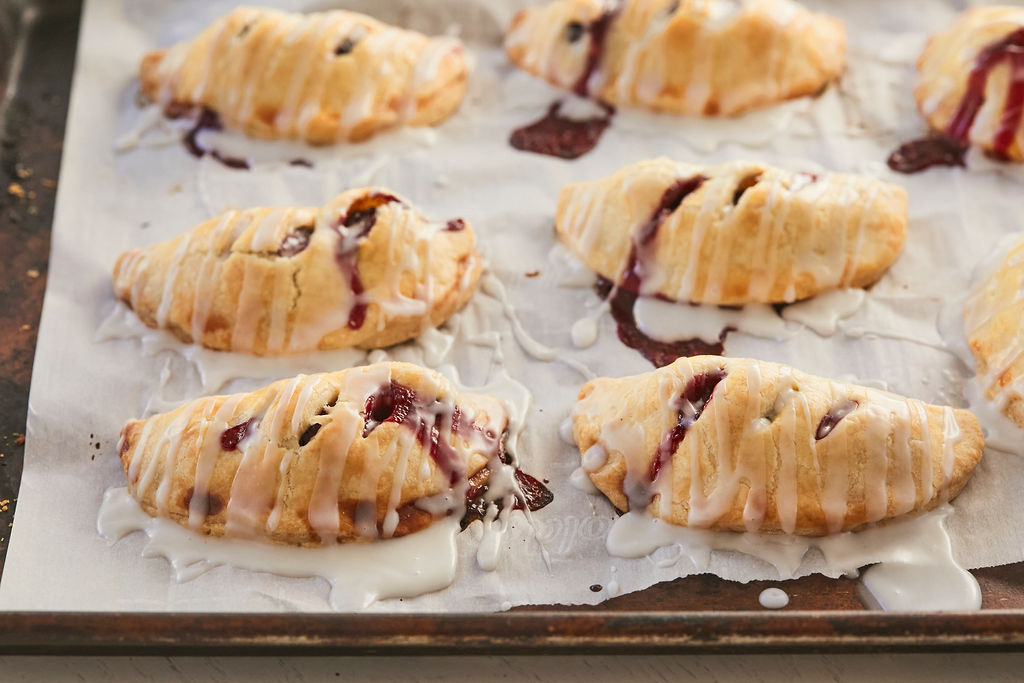
- When you are ready to bake, cut a few slits into the top of the crusts of the pies and brush with the egg wash.
- Bake the pies for about 20-25 minutes, or until the crust is golden brown, in a preheated 375°F (190°C) oven.
- As the pies are baking, make the glaze. In a bowl, mix powdered sugar, milk, and vanilla until blended. It should be pourable, but thick — if it is too thick, add more milk.
- Remove the pies from the oven, let them cool, and pour the glaze over them, which will create a beautiful “shell.”
Pie Crust Recipe
Ingredients
- 1 ⅓ cups (7½oz/213g) all purpose flour
- Pinch of salt
- 1 tablespoon icing sugar
- 7 tablespoons (3 ½ oz/100g) cold unsalted butter, cubed
- 1 egg yolk*
- 2- 3 tablespoons cold water
Instructions
-
Put flour, butter, icing sugar, and salt in a food processor. Pulse until fine crumbs form.
-
Mix together the egg yolks and water and add to the dry ingredients.
-
Pulse until a dough forms, around 10 seconds.
-
Wrap the pastry in cling wrap and refrigerate for 30 minutes to allow the gluten to relax before rolling.
-
Roll on a floured surface to fit your tin or pie dish. A good thickness is 1/4 inch.
-
Bake at 180C/350F depending on how you are using it, as per recipe.
Recipe Notes
if you don’t eat eggs then leave the egg yolk out and add 2 tablespoons of cold water instead.
Posted in Grandma and tagged "Mickey McLaren" -" herself"with no comments yet.
Leave a Reply