IN THIS RECIPE: You’re about to get my tried-and-true recipe for Soft Sugar Cookies — not on the crispier side like my Best-Ever Sugar Cookies, and not exactly chewy like my Chewy Sugar Cookies, but in an incredible, simple, soft league of their own. Decorate them however you want with my included easy icing.
If you’ve been on a search for a recipe for a bakery-style soft sugar cookie, search no more! There’s something really special about mastering a classic and my Soft Sugar Cookies recipe has got all techniques to make your sugar cookie soft just the way you want it.
Decorated to the nines with colored frosting, and of course a mix of fun rainbow sprinkles, these cookies are perfect for all kinds of celebrations!
What Makes Soft Sugar Cookies So Soft
There are just a few tweaks that take sugar cookies from crisp to super soft. Just like all baked goods, these cookies are made with the same ingredients as other sugar cookies: butter, flour, sugar, egg, and baking powder, but in a slightly different ratio. That ratio is key for making them soft and pillowy.
Specifically, what makes these cookies incredibly soft is the amount of butter, which adds rich flavor, and the use of 2 eggs. Using more egg than your average sugar cookie, or shortbread recipe, makes these cookies have a tender bite. The cookies are made quickly in one bowl and bake for only 10 minutes, which means these cookies are a breeze to make.
How To Make Soft Sugar Cookies
You don’t need to get fancy to make these cookies — and you definitely don’t need to be a professional to decorate them. By the end of this recipe, you’ll be confident in your ability to get the same results I did. I’ll let you in on a little secret: decorating isn’t my strong suit, and yet these cookies look great!
When it comes to making these Christmas cookies, or really these any holiday cookies, I even skip the scoop-and-ball method after the chilling (and yes, you need to chill your dough — this is where flavor develops and it keeps your cookies from spreading too much). Instead, I opt for rolling my cookie down into a log. This log then goes into the fridge, and when it comes out you simply slice it. That’s when you bake it.
I’ve tested this recipe, gone through all the trials and tribulations so you don’t have to. Skip the fuss and get the soft cookies you’ve always wanted.
How to Frost Sugar Cookies
A sugar cookie is great on its own, but what Soft Sugar Cookies to the next level is frosting or the icing.
Made of powdered sugar, milk, vanilla, and butter, this frosting is made specifically for super soft sugar cookies. It stays thick and malleable thanks to the butter, and this makes them perfect for swirling atop the cookies using a butter knife or offset spatula. After frosting, I top them with sprinkles. Optional? Yes. But just look at them and tell me if it’s really a choice!
Also, the frosting will set over time and harden on the outside — but the inside will still be soft, perfectly complementing the texture of the cookie itself.
Prep Time15mins
Cook Time10mins
Total Time25mins
Made with the usual sugar cookie ingredients, it’s the special ratio that turns them into my dreamy Soft Sugar Cookies recipe!
In a large bowl, cream together the butter and the sugar until pale and fluffy.
Next, add the eggs and vanilla and mix until just combined.
In a separate bowl, stir together the flour, baking powder, and salt.
Add the dry ingredients into the creamed butter and mix until a dough is formed.
Lay some cling wrap on your counter and spoon your dough on top and form a log. Roll up the log like a sausage and chill the dough for at least 1 hour or pop in the freezer and freeze for up to 8 weeks.
Preheat your oven to 350°F (180°C). Line 2 cookie sheets with parchment paper and set aside.
Once your dough is chilled, slice the cookies around ¼ inch thick. Place the cookies about 2 inches apart on the prepared cookie sheet.
Bake for roughly 10-12 minutes or until slightly golden. Remove from the oven and allow to cool completely on a wire rack.
While the cookies are baking make the icing: Using a whisk, combine the powdered sugar, butter, milk, and vanilla until you have a smooth thick icing. Color the icing with a few drops of food coloring then mix until even in color.
Using a small offset spatula or the back of a small spoon frost the cookies then scatter over sprinkles. Allow setting for about 30 minutes.
Once set, cover and store the cookies in an airtight container for up to 3 days.
Recipe Notes
*Chilling: don’t skip this step! Chilling helps the cookies retain shape and further helps with flavor and texture. In fact, chill for longer if you can!
1/2 pound (2 sticks) unsalted butter, at room temperature
1 cup dark brown sugar, lightly packed
1 cup granulated sugar
2 extra-large eggs, at room temperature
2 teaspoons pure vanilla extract
1 1/2 cups all-purpose flour
1 teaspoon baking powder
1 teaspoon ground cinnamon
1 teaspoon kosher salt
3 cups old-fashioned oatmeal
1 1/2 cups raisins
Directions
Preheat the oven to 350 degrees F.
Place the pecans on a sheet pan and bake for 5 minutes, until crisp. Set aside to cool. Chop very coarsely.
In the bowl of an electric mixer fitted with the paddle attachment, beat the butter, brown sugar, and granulated sugar together on medium-high speed until light and fluffy. With the mixer on low, add the eggs, one at a time, and the vanilla.
Sift the flour, baking powder, cinnamon, and salt together into a medium bowl. With the mixer on low, slowly add the dry ingredients to the butter mixture. Add the oats, raisins, and pecans and mix just until combined.
Using a small ice-cream scoop or a tablespoon, drop 2-inch mounds of dough onto sheet pans lined with parchment paper. Flatten slightly with a damp hand. Bake for 12 to 15 minutes, until lightly browned. Transfer the cookies to a baking rack and cool completely.
Sit back and enjoy…
Let us know … how you like them and if you were able to save some cookies… for the day?
Older cookbooks will sometimes instruct you to remove excess fat from the roast. “Excess” fat is any fat more than an inch thick on the roast. Fat is what you need to give the roast flavor and to make it juicy and tender. Prime rib is expensive and you are paying good money for that fat, so leave it on. Your butcher should have removed any excess fat already.
The most important piece of advice I can give you regarding cooking a prime rib roast is to use a good meat thermometer! I recommend this ChefAlarm by ThermoWorks.
With a remote thermometer, you can tell exactly what the temperature of the meat is without having to open the oven door.
Ingredients
For the Prime Rib Roast:
1 (10 pound) standing rib roast, 3 to 7 ribs (estimate serving 2-3 people per rib), bones cut away from the roast and tied back to the roast with kitchen string (ask your butcher to prepare the roast this way)
Salt
Freshly ground black pepper
For the Gravy:
1/4 cup fat and drippings from the pan
1/4 cup all-purpose flour
3 to 4 cups water, milk, stock, or beer
Salt to taste
Freshly ground black pepper to taste
Method
Salt the roast and let sit at room temp:
Remove the beef roast from the refrigerator 3 hours before you start to cook it. Sprinkle it with salt all over and let it sit, loosely wrapped in butcher paper. Roasts should be brought close to room temperature before they go into the oven to ensure more even cooking.
Tie with kitchen string:
If your butcher hasn’t already done so, cut the bones away from the roast and tie them back on to the roast with kitchen string. This will make it much easier to carve the roast, while still allowing you to stand the roast on the rib bones while cooking.
Preheat the oven and season the roast:
Preheat your oven to 500°F (or the highest temp your oven reaches, if it’s less than 500°F). Pat the roast dry with paper towels (pre-salting should have made the roast release some moisture), and sprinkle the roast all over with salt and pepper.
Place the roast fat-side-up in a roasting pan:
Insert an ovenproof meat thermometer into the thickest part of the roast, making sure that the thermometer isn’t touching a bone.
There are so many variables involved that affect cooking time, this is why you should use a meat thermometer. A prime rib roast is too expensive to “wing it”. Err on the rare side, you can always put the roast back in the oven to cook it a bit longer, if it’s too rare for your tastes.
Brown the roast at 500°F (or as high as your oven will go) for 15 minutes.
Lower the oven to 325°F to finish roasting:
Reduce the oven temperature to 325°F. To figure out the total cooking time, allow about 11 to 12 minutes per pound for rare and 13 to 15 minutes per pound for medium rare.
The actual cooking time will depend on the shape of the roast, how chilled your roast still is when it goes into the oven, and your particular oven. A flatter roast will cook more quickly than a thicker one. A chilled roast will take more time than one closer to room temp.
Roast in the oven until the thermometer registers 115°F for rare or 120° for medium rare, and 130°F for medium.
Check the temperature of the roast using a meat thermometer an hour before you expect the roast to be done. For example, with a 10 pound roast, you would expect 2 hours of total cooking time for rare (15 minutes at 500° and 1 3/4 hours at 325°). In this case, check after 1 hour 15 minutes of total cooking time, or 1 hour after you lowered the oven temp to 325°. (A benefit of using a remote thermometer is that you don’t have to keep checking the roast, you’ll be able to see exactly what the temperature is by looking at the thermometer outside of the oven.)
If the roast is cooking too quickly at this point, lower the oven temperature to 200°F.
Let the roast rest:
Once the roast has reached the temperature you want, remove it from the oven and place it on a carving board. Cover it with foil and let it rest for 15 to 30 minutes before carving. The internal temperature of the roast will continue to rise while the roast is resting.
Slice the roast:
Cut away the strings that were used to hold the roast to the rack of rib bones. Remove the bones (you can save them to make stock for soup later.)
Then, using a sharp carving knife, slice meat across the grain for serving, making the slices about 1/2-inch to 3/4-inch thick.
Make the gravy:
To make the gravy, remove the roast from the pan. Remove excess fat, leaving 1/4 cup of fat plus the browned drippings and meat juices in the roasting pan.
Place the roasting pan on the stovetop on medium high heat. Use a metal spatula to scrape up drippings that might be sticking to the pan.
When the fat is bubbly, sprinkle 1/4 cup of flour over the fat and drippings in the pan.
Stir with a wire whisk to incorporate the flour into the fat. Let the flour brown (more flavor that way and you don’t have the taste of raw flour in your gravy.)
Slowly add 3 to 4 cups of water, milk, stock, or beer to the gravy. Continue to cook slowly and whisk constantly, breaking up any flour lumps.
The gravy will simmer and thicken, resulting in about 2 cups of gravy. (If you want less gravy, start with less fat and flour, and add less liquid.)
Season the gravy with salt and pepper and herbs to taste.
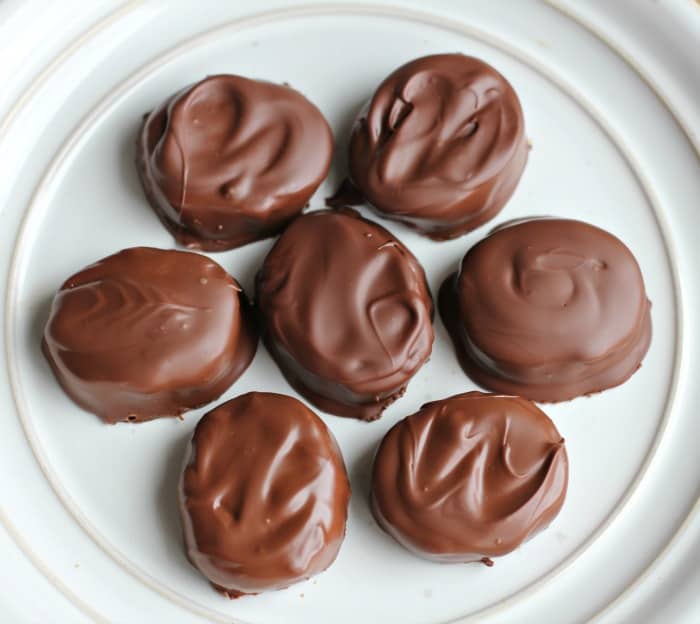
“I know what I want for Easter and it’s these Chocolate Peanut Butter Eggs piled really, really, really high!”
Home-Made Chocolate Peanut Butter Eggs
Reese’s Peanut Butter Cup copy-cat recipe! Yum!!!
This is the 2nd time I ever made copy-cat Reese’s Peanut Butter Eggs and they turned out pretty good both times.
I personally think rolling the peanut butter dough out makes the eggs look better, but you might prefer a more rounded one that you can mold with your hands. I have done them both ways, and using a cookie cutter is easier
Happy Easter to all my chicklets and peeps! Love you all!
Servings: 18
Author: Kim Lange
Ingredients
1cupcreamy peanut butter
¼cupunsalted butter
¼cuplight brown sugar
2cupspowdered sugar
dashsalt, optional
Chocolate Shell
1cupmilk chocolate chips
1cupsemi-sweet chocolate chips
2tablespoonsvegetable shortening
Instructions
Line a baking sheet with wax paper and set aside.
In a medium saucepan over medium heat, combine the peanut butter, butter, and brown sugar and heat until melted stirring constantly. Mixture will bubble, so make sure you keep stirring. Remove from the heat.
Add the powdered sugar a little at a time, stirring until completely combined with the peanut butter mixture.
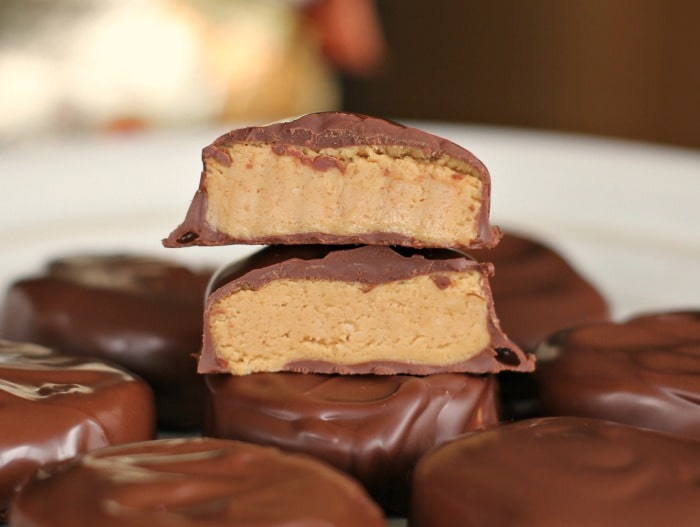
2 Options: Using a tablespoon ice cream scoop or a heaping tablespoon, scoop out peanut butter mixture and shape into eggs or you can roll out your peanut butter dough about 1/2 inch thick and use an egg or round cookie cutter and cut out your eggs. If using a round cookie cutter, just smush the top and bottom of the circle together to resemble an egg.
Place eggs on the baking sheet and refrigerate the peanut butter eggs to allow them to set for about 30 minutes. If you’re in a hurry, you could place them in the freeze for 5 – 10 minutes.
Once the eggs are set, melt the chocolate chips and shortening together in the microwave in 30-second increments, stirring after each, until completely melted, approximately 2 minutes or so.
Use a long-tined fork to flip each peanut butter egg when dipping it in melted chocolate to cover, letting excess chocolate drip off and place on waxed paper. Add an extra spoonful of chocolate to the top to give it some extra chocolate on top, but don’t go overboard. Decorate the eggs however you like. Sprinkles are always good!
Return the chocolate-covered peanut butter eggs to the refrigerator to allow the chocolate to set, about 30 minutes.
Store in the refrigerator in an airtight container until ready to serve.

:max_bytes(150000):strip_icc():format(webp)/__opt__aboutcom__coeus__resources__content_migration__simply_recipes__uploads__2014__12__19150450__prime-rib-method-11-7e012cf1b6194c5e877853587ba0050b.jpg)
:max_bytes(150000):strip_icc():format(webp)/__opt__aboutcom__coeus__resources__content_migration__simply_recipes__uploads__2014__12__prime-rib-method-1-20ff2434a03f4725aa2d2fdca305db82.jpg)
:max_bytes(150000):strip_icc():format(webp)/__opt__aboutcom__coeus__resources__content_migration__simply_recipes__uploads__2014__12__prime-rib-method-2-b77a1cc17b624374a43e5bcf571eab18.jpg)
:max_bytes(150000):strip_icc():format(webp)/__opt__aboutcom__coeus__resources__content_migration__simply_recipes__uploads__2014__12__prime-rib-method-3-86160236715b451bbb4261071049d64b.jpg)